Archive
Getting/Using services deployed in JBoss AS 5.x
JBoss AS Version 5 and above used the JBoss MicroContainer project to accomplish the service management/dependency injection. If we want to write a service that uses a JBoss Server service, like the ‘HAPartitionService’ for example, the below shows several ways that can be done.
1. Using JBoss MC’s xml syntax
This is the most common and recommended way to do. Below is the JBoss RiftSaw Clustering service that uses the ‘HAPartitonService’ from JBoss AS Cluster.
<bean name=" riftsawclusteringservice"="">
      <property name="haPartition"><inject bean="HAPartition"></inject></property>
     <property name="bpelEngineName">bpel/Engine</property>
     <depends>BPELEngine</depends>
See Ales’ Advanced Dependency Injections article for more about MC’s xml syntax.
2. Using JBoss MC’s service programmatically
This way actually is the main topic for this blog entry. If you are a Spring framework user, you would know you can use BeanFactory or ApplicationContext to get the service bean. Then in JBoss, you would wonder, whats the equivalent way to do this?
1) org.jboss.kernel.Kernel, this is the service that has the KernelController and ControllerContext that we need for getting the service. so firstly, you can define a service in -jboss-bean.xml that injects the Kernel service, like the following:
<!--
    Locate the single instance of the kernel
    -->
  <bean name="org.jboss.soa.bpel.runtime.util:service=KernelLocator"
        class="org.jboss.soa.bpel.runtime.integration.KernelLocator">
    <property name="kernel">
      <inject bean="jboss.kernel:service=Kernel" />
    </property>
  </bean>
We’ve defined above class as following:
package org.jboss.soa.bpel.runtime.integration;
public class KernelLocator
{
  private static Kernel kernel;

  public static Kernel getKernel()
  {
    return KernelLocator.kernel;
  }

  public void setKernel(Kernel kernel)
  {
    KernelLocator.kernel = kernel;
  }
}
2) Use the KernelController and ControllerContext to get the service that we defined in *-jboss-bean.xml.
Below is the code to actually obtain the started service out of JBoss AS.
public class KernelAwareSPIFactory
{
   @SuppressWarnings("unchecked")
   public <T> T getKernelProvidedSPI(String beanName, Class<T> spiArtifact)
   {
      KernelController controller = KernelLocator.getKernel().getController();
      ControllerContext ctx = controller.getInstalledContext(beanName);
      return (T)ctx.getTarget();
   }
}
In the end, let’s take an example from RiftSaw code base to show how it was used.
In RiftSaw, we’ve defined a ServerConfig interface.
public interface ServerConfig
{
  /** The default bean name */
  String BEAN_NAME = "org.jboss.soa.bpel.runtime.util:service=ServerConfig";

  String getImplementationTitle();

  String getImplementationVersion();

  File getServerTempDir();

  File getServerDataDir();

  String getWebServiceHost();

  int getWebServicePort();

  .....
}
And then we’ve had the ServerConfigImpl class.
public class ServerConfigImpl implements ServerConfig
{
  ....
}
With this implementation, we’ve defined the ServerConfig service in the *-jboss-bean.xml as following.
<!--
       ServerConfig
    -->
  <bean name="org.jboss.soa.bpel.runtime.util:service=ServerConfig"
        class="org.jboss.soa.bpel.runtime.integration.ServerConfigImpl">
    <property name="mbeanServer"><inject bean="JMXKernel" property="mbeanServer"/></property>
    <property name="webServiceHost">${jboss.bind.address}</property>
  </bean>
Now, finally let’s see how we get this ServerConfig Service in our code.
ServerConfig = new KernelAwareSPIFactory().getKernelProvidedSPI(
       "org.jboss.soa.bpel.runtime.util:service=ServerConfig", ServerConfig.class
And then, here you go, you’ve got the ServerConfig service that is in the JBoss AS.
Hope this can help people who are doing integration with JBoss AS a little bit.
PS: Thanks Glen for pointing out some grammar errors that I did earlier. As what we used to say “your patch has been applied, thanks a lot. ;)”
JBoss AS5 MC articles and presentations.
Ales has written a series of JBoss Microcontainer, which is the core of JBoss AS 5, articles at DZone.
Also, in the youtube, we’ve got the four presentations from Scott Stark and Ales at JavaOne.
- JBoss AS5 Deployment Environment
- JBoss AS5 Component Mixture Patterns
- JBoss AS5 Classloading and OSGI
- JBoss Microcontainer Optimization
If you want to know more about JBoss Microcontainer, you wouldn’t miss the user guide, and its homepage.
Happy learning. 😉
jBPM 4.0 restful service introduction.
We all knew that we’ve had a completely re-write console that is using GWT in jBPM 4.0. But we might not know that we’ve also introduced a set of jbpm restful service. Specifically, it is including following resources: Process Management, Task Management, User Management, Process Engine service etc. These resources are exchanged by using json as data format. The jBPM console (http://localhost:8080/jbpm-console) operates jbpm services through this restful services.
Assume that you’ve installed the jBPM 4.0, started the server, you can see all available services at http://localhost:8080/gwt-console-server/rs/server/resources url. This page basically lists the most important information for the services, like the Method (could be GET, POST etc), the url, consume and produce data format etc.
Now, lets look at how many components are consist of this restful service. In the jBPM server, we can find following three packages.
$JBoss/server/default/lib/gwt-console-rpc.jar
$JBoss/server/default/lib/gwt-console-server-integration.jar
$JBoss/server/default/deploy/jbpm/gwt-console-server.war
These three libraries is the backbone of our restful services.
1. gwt-console-rpc.jar: this jar includes all the domain classes that server used to expose. In other word, this jar define all of data format that we are going to expose to the client.
2. gwt-console-server-integration: This package includes all of abstracted SPIs(Service Provider Interface), like TaskManagement etc. jBPM integration layer uses this to implement these SPIs.
3. gwt-console-server.war: This artifact extends the rpc and server-integration modules(the artifacts in the default/deploy folder will see all libaries in the default/lib folder) , also leverages the RESTEasy lib to expose all of service to be restful. (here we are using the RESTEasy’s jaxb-json provider to expose all the domain model into json data format.)
* Tip: we’ve put all of jBPM related API into the jbpm.jar itself (you can find it under the $JBoss/server/default/lib/jbpm.jar). For the jBPM integration point, we are getting the ProcessEngine API from the JNDI at “java:/ProcessEngine”.
Now you saw these services. Next I will write a simple test to use this service to show you how you can leverage it.
For its simplicity, I won’t do it in the html, that is what jBPM console did, here I will write a test client, and then use the Gson library to convert the json into our domain model(in our gwt-console-rpc).
public class RestfulServiceTest extends TestCase {

  public void testDeploymentRestfulService() throws Exception {
      URL url = new URL("http://localhost:8080/gwt-console-server/rs/engine/deployments");
      HttpURLConnection connection = (HttpURLConnection)url.openConnection();
      connection.setRequestMethod("GET");

      BufferedReader reader = new BufferedReader(new
                InputStreamReader(connection.getInputStream()));

      StringBuffer buffer = new StringBuffer();
      String line = reader.readLine();
      while (line != null)
      {
       buffer.append(line);
       line = reader.readLine();
      }

      System.out.println(buffer.toString());

      Gson gson = new Gson();
      DeploymentRefWrapper result = gson.fromJson(buffer.toString(), DeploymentRefWrapper.class);

      for (DeploymentRef deploymentRef : result.getDeployments()) {
          System.out.println("deployment name is: " + deploymentRef.getName());
      }

      connection.disconnect();
  }

}
Before you run the above code, you need to make sure that you’ve started the jBPM 4.0, and deployed a bar file into the server. Otherwise you would see nothing, as there were no data on the server. (you can refer to my previous blogs if you don’t know how to start and deploy bar artifact into server).
* Note: You need to add the gson lib in your classpath.
Run the test code, you would get following result.
{"deployments":[{"id":"1","suspended":false,"name":"helloworld.bar","timestamp":1249805642238,"definitions":["helloworld-1"],"resourceNames":["review.ftl","META-INF/","META-INF/MANIFEST.MF","helloworld.jpdl.xml","helloworld.png"]}]}

deployment name is: helloworld.bar
First one is the whole data in json format.
[Reference]
1. BPM Console Reference
Updates on JBoss ESB.
The JBoss ESB team rolled out its 4.6 release yesterday, one of its main feature that it is introduced is to support the JBoss AS5, so go and grab it to try it out.
Also spotted that Len has composed three great posts on JBoss SOA-P, it applies also to the JBoss ESB.
1. SOA Platform Gateways and Notifiers. This talks about the Gateway, ESB aware message, ESB non-aware message, Notifier concepts that from the JBoss ESB.
2. When The Content knows the way. This talks about the JBoss ESB integrates with Drools.
3. Hanging Together on the SOA Platform – Introduction to the ESB-jBPM integration. This entry talks about the ESB and jBPM integration.
One thing that I must say is that these three entries are very well written, easy to understand. Very good work, Len. 😉
If you want to read more Len’s posts, then follow the soa-p’s blog.
Getting Started with jBPM 4.0 (Part IV)
As said in part III, we will revise our example, to create the task form, and then use the jbpm console to take or complete the task.
Firstly, because there was a minor issue related to this feature, which was reported here in the jBPM jira, we will use the ‘form’ attribute in the jpdl file.
1.Add the task form template
Here, we will create a freemarker template file, named review.ftl. the files content is as following:
<html>
<body>
<h2>Please review the request
<form action="${form.action}" method="POST" enctype="multipart/form-data">
<#list outcome.values as transition>
<input type="submit" name="outcome" value="${transition}">
</#list>
</form>
</body>
</html>
2.Add the form attribute in task node
As we said earlier, due to the JBPM-2423 issue in jBPM 4.0 GA, we need to update our jpdl to associate our task form template. the updated section is as following.
<task assignee="alex" g="277,235,92,52" name="review" form="review.ftl">
<transition g="-73,-25" name="approved" to="audit"/>
</task>
3. Update the build.xml, to include the .ftl file in .bar archive
The last step would be to update our build.xml, to include the ftl template file, and also include the png file for the diagram show usage in our jbpm console.
The updated bar package built script is:
<target name="bar" depends="init">
<jar destfile="${basedir}/target/helloworld.bar">
  <fileset dir="${basedir}/src/main/resources">
        <include name="*.jpdl.xml" />
      <include name="*.ftl" />
    <include name="*.png" />
</fileset>
   </jar>
</target>
That is it, now you can re-deploy it into the jBPM server, like we said in the part3.
Task Form in jBPM console
well, after we started the process instance, let’s see the diagram and the task form in its console UI.
On the process instance tab, click the ‘diagram’ button in the instance details page, you would see page as following picture.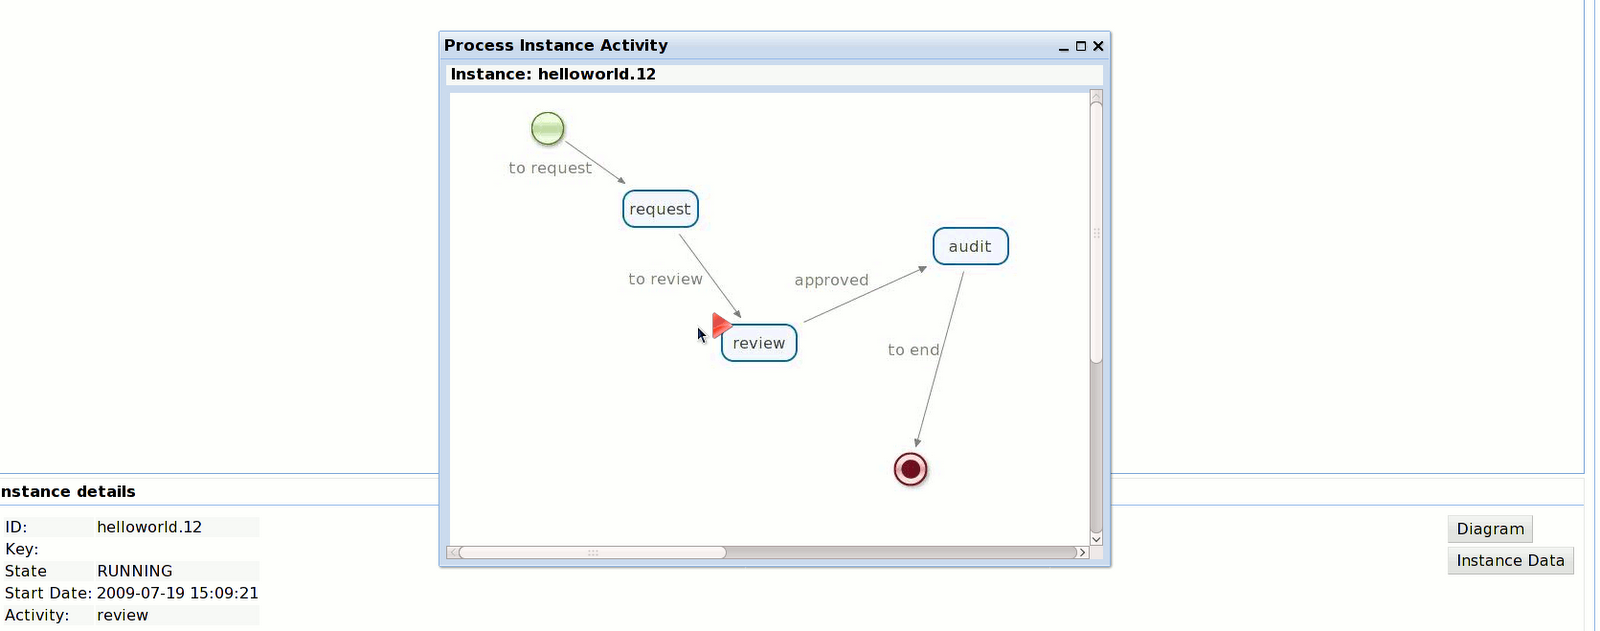
Go to the task list -> Personal tasks, you would see there is a task, the name is called “review”, select the task and click the ‘view’ button, it would pop up the task form interface as following picture.
Once you click the ‘approved’ button, the task is completed, and the whole process goes to the ‘audit’ state as we’ve defined in the jpdl file.
So, that is all for the task form example. If you want to know more about the template, like syntax, you can refer to the freemarker webiste.
One thing interesting is that there is a console-server, which is the jbpm console talk to, the console server is responsible for exposing the jBPM service as a RESTful services. You can go to “http://localhost:8080/gwt-console-server/rs/server/resources” to see all available resources. we won’t go detail in this entry, this is an interesting topic that we will cover in the future blog entry.
Summary
Until now, this 《Getting Started with jBPM 4.0》series is finished, you can download the jbpm-helloworld example as a tar ball from here. Its aim is to help you get started, if you want to know more about jBPM 4.0, the userguide and dev guide are very good documents, and you also shouldn’t miss the jbpm user forum.
Getting Started with jBPM 4.0 (Part III)
In this entry, we are going to deploy the built process definition into jBPM server. Basically, we need to deploy two artifacts, one is the process definition file, which is archived as .bar file, the other is the classes file that will be needed.
Deploy the process definition into jBPM server
jBPM offer its ant jBPM deploy task out of box, the example also uses this way to deploy the process definiton, the other way to do it is to move this .bar file to the jboss deploy folder directly, it will be pick up and deployed into db as well, thanks to the jBPM deployer that leverage JBoss AS 5 deployer framework.
In order to use both these ways, we will add the build.xml to help us do the bar, jar build work.
below is the code snippet from the build.xml.
 <target name="jar" depends="init">
<mkdir dir="${basedir}/target/classes" />
<javac srcdir="${basedir}/src/main/java"
destdir="${basedir}/target/classes"
classpathref="classpath.lib" />
<jar destfile="${basedir}/target/helloworld.jar" >
<fileset dir="${basedir}/target/classes">
<include name="**/*.class" />
</fileset>
</jar>
</target>

<target name="bar" depends="init">
<jar destfile="${basedir}/target/helloworld.bar">
<fileset dir="${basedir}/src/main/resources">
<include name="*.jpdl.xml"/>
</fileset>
</jar>
</target>
we will look into both two deployment ways, one is using ant task, the other is using jBPM deployer, the underlie is the same, it is using the RepositoryService to do the deployment work.
1. using jBPM deployer.
<target name="deploy" description="deploys the business archives into jboss"
    depends=" jar,bar">
<mkdir dir="${jboss.server.config.dir}/deploy/jbpm/userlibs"/>
<copy file="${basedir}/target/helloworld.bar"
todir="${jboss.server.config.dir}/deploy/jbpm/userlibs"
overwrite="true" />
<copy file="${basedir}/target/helloworld.jar"
todir="${jboss.server.config.dir}/deploy/jbpm/userlibs"
overwrite="true" />
</target>
2. Use the jBPM deployer ANT task.
  <target name="jbpm.deploy"
description="deploys the business archives"
depends=" jar, bar">
<copy file="${jbpm.home}/db/hibernate.cfg/${database}.hibernate.cfg.xml"
tofile="${basedir}/target/classes/jbpm.hibernate.cfg.xml"
overwrite="true">
<filterset filtersfile="${jbpm.home}/db/jdbc/${database}.properties" />
</copy>
<copy file="${basedir}/src/test/resources/jbpm.cfg.xml"
   tofile="${basedir}/target/classes/jbpm.cfg.xml"
/>
<taskdef name="jbpm-deploy"
  classname="org.jbpm.pvm.internal.ant.JbpmDeployTask"
classpathref="classpath.lib" />
<jbpm-deploy file="${basedir}/target/helloworld.bar" />

<mkdir dir="${jboss.server.config.dir}/deploy/jbpm/userlibs" />
<copy file="${basedir}/target/helloworld.jar"
todir="${jboss.server.config.dir}/deploy/jbpm/userlibs"
overwrite="true" />
</target>
Note: The jBPM server needs to be up and running, and then you deploy the process archive into server through either way.
jBPM console tour
After we deployed our process, we will use the console to see the process information etc.
Let’s login http://localhost:8080/jbpm-console, with the ‘alex/password’ combination, it will direct us to the console homepage, as following page.
Click the ‘Runtime’ tab from the left menu panel, we can see the ‘Deployments’ and ‘Jobs’ links. Click the ‘Deployments’, we can see the helloworld.bar that we just deployed.
Click the ‘Processes’ tab from the left menu panel, we can see the ‘Definition List’ link, click it, it will show us all of the process definitions as following.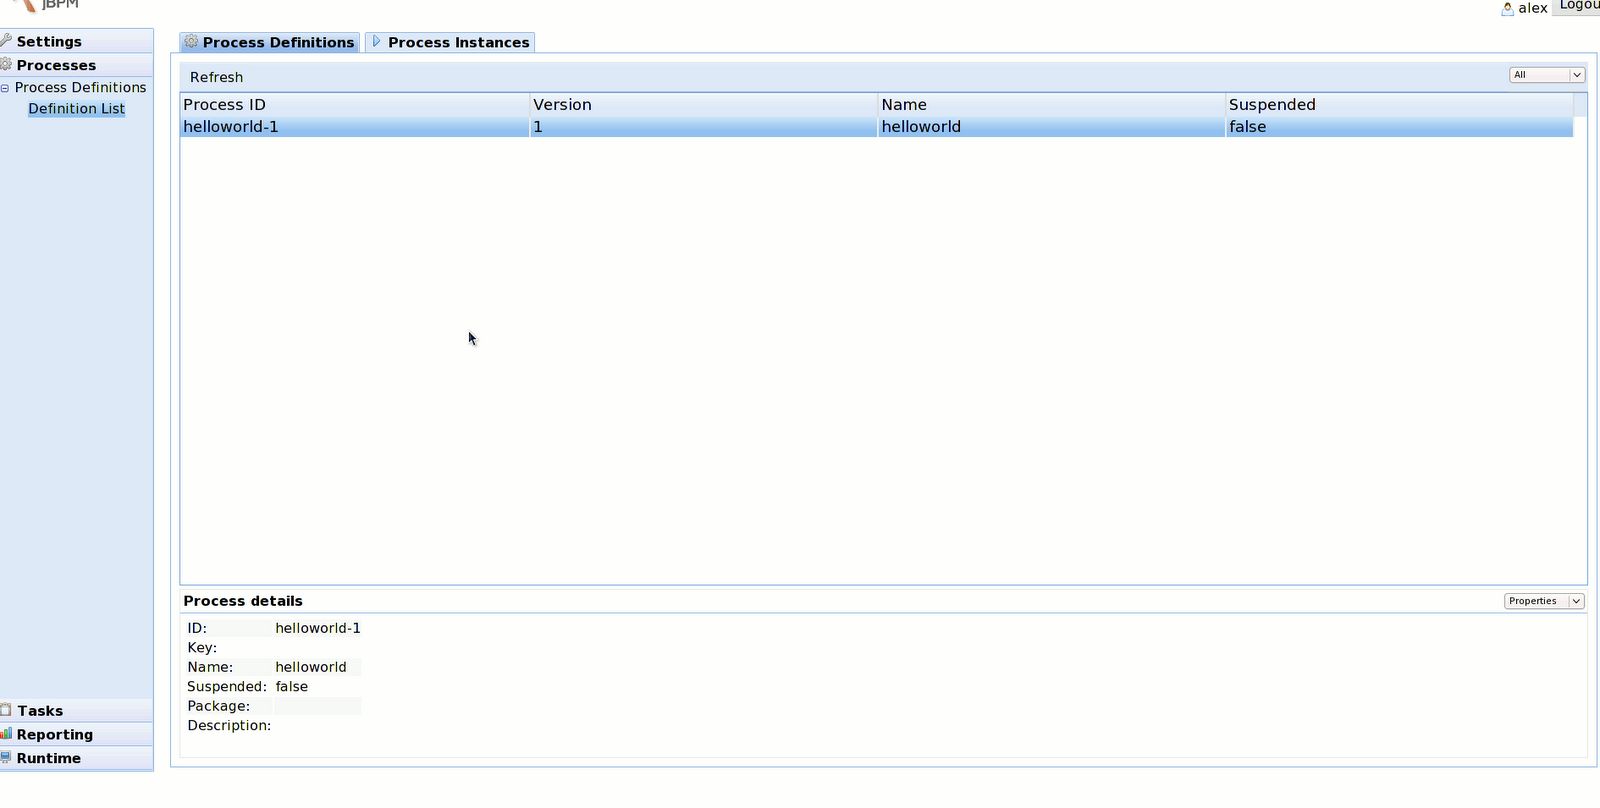
Click the ‘Process Instances’ tab from the right area, click the ‘start’ button, which will start the process definition, its instace detail looks like:
Also, look on the server’s console, you would notice that following lines:
17:37:44,566 INFO  [STDOUT] --------------------
17:37:44,567 INFO  [STDOUT] Made a request.....
17:37:44,567 INFO  [STDOUT] ---------------------
So, it means, the started process instance already gone through the java node, and right now is on the ‘review’ activity node. Remembered that we assigned this task to ‘alex’ in the process definition, and we login the console by using alex, so we should be able to see this task in the task tab from left panel.
Click the ‘Tasks’ -> ‘Task Lists’ -> ‘Personal Tasks’, you would see the page as following.
You can view or release this task. Currently, if you click the ‘view’ button, it will tell you that ‘The task doesn’t provide a UI’. we haven’t added the UI page for this task yet, which we will talk about it in the next entry.
Because this entry is a bit lengthy, I think it is better that I make a summary here. Basically we talked about two ways to deploy the process and its classes into jBPM server, once you’ve deployed it, you should be able to see as much as information from the jbpm console, which is very fancy, built based on GWT.
In the next entry, I will try to talk about the task form in the console, stay tuned.
Getting Started with jBPM 4.0 (Part II)
In this blog entry, we are going to use the eclipse GUI to build a helloworld process, and then write a unit test to verify the process.
Firstly, I assumed that you’ve successfully installed the eclipse GUI, if you haven’t done so, please refer to the first Part blog entry.
Create Project and Process Definition
Then, we will create a java project, I used the following project layout(maven way).
we will put the process definition file into the main/resource folder, and the test case & its resources in the src/test folder.
In this helloworld process, we will do the following process scenario.
we will have a ‘java node’, to make a request, and then we add the ‘review task node’, and then if it is ‘approved’, it will lead to the ‘audit state node’. Of course, we will include the ‘start’ and the ‘end’ node in this process, so the finished process image would be like:

In this process definition, we are using a java node to be the ‘request’ node, its java code as following:
package org.jbpm.helloworld;

public class Println {

public void request() {
    System.out.println("--------------------");
    System.out.println("Made a request.....");
    System.out.println("---------------------");
}
}
The process definition xml is as following:
<process name="helloworld" xmlns="http://jbpm.org/4.0/jpdl">
<start  name="start">
  <transition  name="to request" to="request"/>
</start>
<end  name="end"/>
<java class="org.jbpm.helloworld.Println"  method="request" name="request">
  <transition  name="to review" to="review"/>
</java>
<task assignee="alex"  name="review">
  <transition  name="approved" to="audit"/>
</task>
<state  name="audit">
  <transition  name="to end" to="end"/>
</state>
</process>
The xml itself is very easy to understand, you might notice that ‘g’ attribute in your process definition file, that is only used by the Eclipse GUI.
Verify the process
Once we’ve finished the process, we want to verify whether it is as same as we expected, with the jBPM 4.0, it is very easy for us to verify it, without deploying it into the container.
With the following 2 steps, we can easily test the process by using API.
Because the jbpm.jar doesn’t include the jbpm.hibernte.cfg.xml and jbpm.cfg.xml, we need to configure it by ourselves for the test purpose. (However, The deployed jbpm in JBoss container has these two files by default)
- Add the jbpm.hibernate.cfg.xml and jbpm.cfg.xml.
- Write the test case, which extends the JbpmTestCase
we put these two files into the src/test/resource folder.
the jbpm.hibernate.cfg.xml would be like as following:
<hibernate-configuration>
 <session-factory>

    <property name="hibernate.dialect">org.hibernate.dialect.HSQLDialect
    <property name="hibernate.connection.driver_class">org.hsqldb.jdbcDriver
    <property name="hibernate.connection.url">jdbc:hsqldb:mem:.
    <property name="hibernate.connection.username">sa
    <property name="hibernate.connection.password">
    <property name="hibernate.hbm2ddl.auto">create-drop
    <property name="hibernate.format_sql">true

    <mapping resource="jbpm.repository.hbm.xml" />
    <mapping resource="jbpm.execution.hbm.xml" />
    <mapping resource="jbpm.history.hbm.xml" />
    <mapping resource="jbpm.task.hbm.xml" />
    <mapping resource="jbpm.identity.hbm.xml" />

 </session-factory>
</hibernate-configuration>
and here it is the jbpm.cfg.xml:
<jbpm-configuration>
 <import resource="jbpm.default.cfg.xml" />
 <import resource="jbpm.tx.hibernate.cfg.xml" />
 <import resource="jbpm.jpdl.cfg.xml" />
 <import resource="jbpm.identity.cfg.xml" />
</jbpm-configuration>
Now, we are ready to write the process unit test.
public class ProcessTest extends JbpmTestCase {
String deploymentId;

public void setUp() throws Exception {
 super.setUp();
 deploymentId = repositoryService.createDeployment()
     .addResourceFromClasspath("helloworld.jpdl.xml")
     .deploy();
}

public void testProcess() throws Exception {
 ProcessInstance instance = executionService.startProcessInstanceByKey("helloworld");
 String pid = instance.getId();

 assertTrue(instance.isActive("review"));

 List tasks = taskService.findPersonalTasks("alex");
 Task task = tasks.get(0);
 taskService.completeTask(task.getId(), "approved");

 instance = executionService.findProcessInstanceById(pid);
 String exeId = instance.findActiveExecutionIn("audit").getId();
 executionService.signalExecutionById(exeId, "to end");

 HistoryProcessInstance historyInstance = historyService.createHistoryProcessInstanceQuery()
          .processInstanceId(pid).uniqueResult();
 assertEquals("ended", historyInstance.getState());
}

public void tearDown() throws Exception {
 repositoryService.deleteDeploymentCascade(deploymentId);
 super.tearDown();
}
1) we used the repositoryService to deploy our process file.
2) we used the executionService to start the process.
3) after it starts, it should be at the ‘review’ task node.
4) used the taskService to get the specific task, and complete the task.
5) once it completes, it should be at the ‘audit’ task, as it is a wait state.
6) use the executionService.signal method to proceed the process, it goes to the ‘end’, which means the process should be ended.
7) use the historyService to check whether the process is ended or not. Please noted that in the jBPM 4.0, the finished process instance was stored in a separate db table, so you can’t use the executionService API to look for the finished process instances.
The process unit test should be passed with green in Junit, and the console output is like:
Jul 12, 2009 11:08:17 AM org.hibernate.tool.hbm2ddl.SchemaExport execute
INFO: schema export complete
——————–
Made a request…..
———————
So, that is it, you’ve already built an process, and verify it. It is simple, isn’t it? 😉
In next entry, I will try to deploy our process into the jBPM server.
Getting Started with jBPM 4.0 – (Part I )
jBPM 4.0 was out yesterday, so I played it with a simple example, also include installing the eclipse plugin, and see the jbpm console, which I haven’t tried them out before, to get a feeling about them. Below are the steps that I did, hopefully you find it helpful for you to get started.
Install jBPM and JBoss
1. Download the jbpm 4.0 distribution.
2. Extract it into your local directory, here mine is: /local/deploy
3. Go to jbpm-4.0/jboss.
4. Added the build.properties into ${user.home}/.jbpm4 directory if you want to update the default properties in the ant script. (below is what I did, I used the jboss-5.0.1.GA, and I already had the zip ball in the /local/softwares directory)
database=hsqldb
jboss.version=5.0.1.GA
jbpm.parent.dir=/local/deploy
jboss.distro.dir=/local/softwares
You can refer to this wiki entry for detail.
5. run following command to install jboss & jbpm.
ant install.jboss
ant install.jbpm.into.jboss
Now, you go to the jbpm-4.0/jboss-5.0.1.GA, run:
bin/run.sh -c default.
It should start the jbpm server properly, later then we need to populate the schema & initialized sqls.
Import jBPM db schema and identity sql
1. Go to jBPM-4.0/db, run following command to populate the schema & sql.
ant create.jbpm.schema
ant load.example.identities
Now, you can go to http://localhost:8080/jbpm-console, use the ‘alex/password’ as the username and password combination, you should be able to log in the jbpm console.
Install the jBPM eclipse plugin
I won’t described the steps for its installation, as it was very well documented in the user guide.
Note, it was based on the eclipse 3.5 jee distribution.
In the next entry, we will try to build a simple process by using the Eclipse GUI.
jBPM4.0 framework exploring
I just finished a 0.1 version of 《jBPM 4.0 framework exploring》 , it is written in Chinese, I would say the jbpm4.0 framework is very neat, and easy to understand, it is very flexible.
So, if you are looking for a good BPM library, then I would strongly recommend that try out the jBPM 4.0, whose GA will be supposed to be released at July 1st.
If you have any comments on the article, you can leave your comments here. 😉
"JBoss ESB Introduction" article (its written in chinese).
Just finished a writing of JBoss ESB introduction in chinese, I think JBoss ESB is a good ESB implementation, and it has plenty of quick starts, which can help you get it started very quickly. And one of its strong points is that it integrates with jBPM, JBoss Rules, Smooks seamlessly. So it worths you to check it out. Hopefully my little article can help you understand it more quickly if you can read chinese. 😉
