Archive
Getting/Using services deployed in JBoss AS 5.x
JBoss AS Version 5 and above used the JBoss MicroContainer project to accomplish the service management/dependency injection. If we want to write a service that uses a JBoss Server service, like the ‘HAPartitionService’ for example, the below shows several ways that can be done.
1. Using JBoss MC’s xml syntax
This is the most common and recommended way to do. Below is the JBoss RiftSaw Clustering service that uses the ‘HAPartitonService’ from JBoss AS Cluster.
<bean name=" riftsawclusteringservice"="">
      <property name="haPartition"><inject bean="HAPartition"></inject></property>
     <property name="bpelEngineName">bpel/Engine</property>
     <depends>BPELEngine</depends>
See Ales’ Advanced Dependency Injections article for more about MC’s xml syntax.
2. Using JBoss MC’s service programmatically
This way actually is the main topic for this blog entry. If you are a Spring framework user, you would know you can use BeanFactory or ApplicationContext to get the service bean. Then in JBoss, you would wonder, whats the equivalent way to do this?
1) org.jboss.kernel.Kernel, this is the service that has the KernelController and ControllerContext that we need for getting the service. so firstly, you can define a service in -jboss-bean.xml that injects the Kernel service, like the following:
<!--
    Locate the single instance of the kernel
    -->
  <bean name="org.jboss.soa.bpel.runtime.util:service=KernelLocator"
        class="org.jboss.soa.bpel.runtime.integration.KernelLocator">
    <property name="kernel">
      <inject bean="jboss.kernel:service=Kernel" />
    </property>
  </bean>
We’ve defined above class as following:
package org.jboss.soa.bpel.runtime.integration;
public class KernelLocator
{
  private static Kernel kernel;

  public static Kernel getKernel()
  {
    return KernelLocator.kernel;
  }

  public void setKernel(Kernel kernel)
  {
    KernelLocator.kernel = kernel;
  }
}
2) Use the KernelController and ControllerContext to get the service that we defined in *-jboss-bean.xml.
Below is the code to actually obtain the started service out of JBoss AS.
public class KernelAwareSPIFactory
{
   @SuppressWarnings("unchecked")
   public <T> T getKernelProvidedSPI(String beanName, Class<T> spiArtifact)
   {
      KernelController controller = KernelLocator.getKernel().getController();
      ControllerContext ctx = controller.getInstalledContext(beanName);
      return (T)ctx.getTarget();
   }
}
In the end, let’s take an example from RiftSaw code base to show how it was used.
In RiftSaw, we’ve defined a ServerConfig interface.
public interface ServerConfig
{
  /** The default bean name */
  String BEAN_NAME = "org.jboss.soa.bpel.runtime.util:service=ServerConfig";

  String getImplementationTitle();

  String getImplementationVersion();

  File getServerTempDir();

  File getServerDataDir();

  String getWebServiceHost();

  int getWebServicePort();

  .....
}
And then we’ve had the ServerConfigImpl class.
public class ServerConfigImpl implements ServerConfig
{
  ....
}
With this implementation, we’ve defined the ServerConfig service in the *-jboss-bean.xml as following.
<!--
       ServerConfig
    -->
  <bean name="org.jboss.soa.bpel.runtime.util:service=ServerConfig"
        class="org.jboss.soa.bpel.runtime.integration.ServerConfigImpl">
    <property name="mbeanServer"><inject bean="JMXKernel" property="mbeanServer"/></property>
    <property name="webServiceHost">${jboss.bind.address}</property>
  </bean>
Now, finally let’s see how we get this ServerConfig Service in our code.
ServerConfig = new KernelAwareSPIFactory().getKernelProvidedSPI(
       "org.jboss.soa.bpel.runtime.util:service=ServerConfig", ServerConfig.class
And then, here you go, you’ve got the ServerConfig service that is in the JBoss AS.
Hope this can help people who are doing integration with JBoss AS a little bit.
PS: Thanks Glen for pointing out some grammar errors that I did earlier. As what we used to say “your patch has been applied, thanks a lot. ;)”
Exploring ODE part V: implemenation of scheduler-simple module.
In Ode/RiftSaw, we make the process execution as asynchronous, which means that if you running a bpel process, we are using more than one thread to accomplish this invocation.
And this is what the scheduler-simple module for, it takes care of putting a task into database and pull tasks out of database and how to run them. Lets make a simple example here, say your bpel process has a invoke Activity to invoke an external web service. In Ode, just right before entering invoke Activity, we’ve created a job that captures this invoke activity information, and store it into the database. Because once we’ve started Ode Bpel Server, we already started a background thread that checks this ode_job table periodically, once we’ve found that there is a job needs to be executed, it will load it from database, put it into memory, and then submit it to the ExecutorService for execution.
In this blogpost, we will examine this module’s architecture and important APIs.
First is the Task API, this is the parent class for Job and SchedulerTask.
class Task {
    /** Scheduled date/time. */
    public long schedDate;

    Task(long schedDate) {
        this.schedDate = schedDate;
    }
}
It is very simple, just had a scheduled date for its execution.
Next, we will see the Job’s API, Job is for invoking an external service and like. we’ve put all of important information into the JobDetail object.
class Job extends Task {
    private static final SimpleDateFormat DATE_FORMAT = new SimpleDateFormat("yyyy-MM-dd HH:mm:ss z");

    String jobId;
    boolean transacted;
    JobDetails detail;
    boolean persisted = true;

    public Job(long when, String jobId, boolean transacted, JobDetails jobDetail) {
        super(when);
        this.jobId = jobId;
        this.detail = jobDetail;
        this.transacted = transacted;
    }
....
}
Now, lets look at another type of Task, which is called SchedulerTask.
private abstract class SchedulerTask extends Task implements Runnable {
    SchedulerTask(long schedDate) {
        super(schedDate);
    }
}
This is an abstract class, its subclasses are: LoadImmediateTask, UpgradeJobsTask, CheckStaleNodes.
To understand these tasks, it is better that we look at what SimpleScheduler class defined. In Ode, the job design was based around three time horizons: “immediate”, “near future”, and “everything else”.
Immediate jobs (i.e. jobs that are about to be up) are written to the database and kept in an in-memory priority queue. When they execute, they are removed from the database. Near future jobs are placed in the database and assigned to the current node, however they are not stored in
memory. Periodically jobs are “upgraded” from near-future to immediate status, at which point they get loaded into memory. Jobs that are further out in time, are placed in the database without a node identifer; when they are ready to be “upgraded” to near-future jobs they are assigned to one
of the known live nodes. recovery is straight forward, with stale node identifiers being reassigned to known good nodes.
In terms of time, we defined two variables, one is: _immediateInterval and _nearFutureInterval.
if a job’s scheduled date is between [now, now + _immediateInterval], it belongs to the “immediate” job.
while if it is in [now + _immediateInterval, now + _nearFutureInterval], it belongs to the “near future” job then.
You can check the SimpleScheduler.doLoadImmediate() and SimpleScheduler.doUpgrade() respectively for its logic.
Also, you may be aware that we’ve also had the CheckStaleNodes task, this is basically for clustering work, to
check if there are any stale nodes, if it has, we will move the assigned jobs over to other node by updating nodeId.
So now, we’ve seen different Tasks, like Jobs and SchedulerTask. Now, we will need an interface to run these Tasks, hence TaskRunner was introduced.
interface TaskRunner {
    public void runTask(Task task);
}
Here is the implementation from SimpleScheduler.TaskRunner() method.
public void runTask(final Task task) {
    if (task instanceof Job) {
        Job job = (Job)task;
        if( job.detail.getDetailsExt().get("runnable") != null ) {
            runPolledRunnable(job);
        } else {
            runJob(job);
        }
    } else if (task instanceof SchedulerTask) {
        _exec.submit(new Callable() {
            public Void call() throws Exception {
                try {
                    ((SchedulerTask) task).run();
                } catch (Exception ex) {
                    __log.error("Error during SchedulerTask execution", ex);
                }
                return null;
            }
        });
    }
}
As I said before, once we’ve start BpelServer, we will start a thread running, it only gets stopped only when the BpelServer is been stopped.
Thats called SchedulerThread.
In this class, basically we had following members: PriorityBlockingQueue, this is queue for the immediate execution. TaskRunner, this is the
container for running Task. The logic for the running is quite straight forward.
/**
 * Pop items off the todo queue, and send them to the task runner for processing.
 */
public void run() {
    while (!_done) {
        _lock.lock();
        try {
            long nextjob;
            while ((nextjob = nextJobTime()) > 0 && !_done)
                _activity.await(nextjob, TimeUnit.MILLISECONDS);

            if (!_done && nextjob == 0) {
                Task task = _todo.take();
                _taskrunner.runTask(task);

            }
        } catch (InterruptedException ex) {
            ; // ignore
        } finally {
            _lock.unlock();
        }
    }
}

Now that we've seen all of important APIs here, we will look at how we start SimpleScheduler when ODEServer is started.
excerpt from SimpleScheduler.start() method.

public synchronized void start() {
    if (_running)
        return;

    if (_exec == null)
        _exec = Executors.newCachedThreadPool();

    _todo.clearTasks(UpgradeJobsTask.class);
    _todo.clearTasks(LoadImmediateTask.class);
    _todo.clearTasks(CheckStaleNodes.class);
    _processedSinceLastLoadTask.clear();
    _outstandingJobs.clear();

    _knownNodes.clear();

    try {
        execTransaction(new Callable() {

            public Void call() throws Exception {
                _knownNodes.addAll(_db.getNodeIds());
                return null;
            }

        });
    } catch (Exception ex) {
        __log.error("Error retrieving node list.", ex);
        throw new ContextException("Error retrieving node list.", ex);
    }

    long now = System.currentTimeMillis();

    // Pretend we got a heartbeat...
    for (String s : _knownNodes) _lastHeartBeat.put(s, now);

    // schedule immediate job loading for now!
    _todo.enqueue(new LoadImmediateTask(now));

    // schedule check for stale nodes, make it random so that the nodes don't overlap.
    _todo.enqueue(new CheckStaleNodes(now + randomMean(_staleInterval)));

    // do the upgrade sometime (random) in the immediate interval.
    _todo.enqueue(new UpgradeJobsTask(now + randomMean(_immediateInterval)));

    _todo.start();
    _running = true;
}
Also, please noted that we had two different types of JobProcessor, one is ordinary JobProcessor, the other one is PolledRunnableJobProcessor, which is meant for running some jobs that gets run periodically.
JBoss AS5 MC articles and presentations.
Ales has written a series of JBoss Microcontainer, which is the core of JBoss AS 5, articles at DZone.
Also, in the youtube, we’ve got the four presentations from Scott Stark and Ales at JavaOne.
- JBoss AS5 Deployment Environment
- JBoss AS5 Component Mixture Patterns
- JBoss AS5 Classloading and OSGI
- JBoss Microcontainer Optimization
If you want to know more about JBoss Microcontainer, you wouldn’t miss the user guide, and its homepage.
Happy learning. 😉
Soft delete, or Hard delete.
Read the topic of whether we should use the ‘soft delete’ or ‘hard delete’ when we are building enterprise application. It was started by Ayende’s ‘Avoid soft deletes’, and then Udi Dahan says ‘don’t delete, just dont’. InfoQ has a thread to discuss about it. Personally, I agree with Udi Dahan. I didn’t say that we should always use soft delete. But I would say use it in most cases, compared to the hard delete.
Publishing web service in JBoss ESB
As of this writing, JBoss ESB 4.6 has two ways of publishing web service for ESB service.
1. Using JSR 181 annotation to do the web service publish and use SOAPProcessor action to connect it in ESB.
2. Providing the in,out, fault xsd schema to generate the wsdl dynamically and publish the web service.
These two ways are not exclusive, it is for different usage:
1. The first one is using JBossWS to publish the annotated Java service, and then using the SOAPProcessor to be a thin wrapper for the existed web service.
2. The second one, which we called EBWS(Endpoint Web Service), is asking developers to provide the in,out,fault xsd if it is required, And then uses these xsds, plus the service info (like service name, category etc) that were defined in the jboss-esb.xml to generate the wsdl and publish the web service.
The JBoss ESB distribution has both quick start examples for these two scenarios. We will examine them in order shortly, quickstart/webservice_producer sample is using the first approach that we’ve described, while the quickstart/publish_as_webservice is the EBWS as we said.
web service producer using SOAPProcessor
We will examine the first approach, below are the steps that is required to publish a web service in ESB.
1.Add the impl class with jsr 181 annotation
Lets see the GoodbyeWorldWS.java class, this is the class that is supposed to expose as web service.
@WebService(name = "GoodbyeWorldWS", targetNamespace="http://webservice_producer/goodbyeworld")
public class GoodbyeWorldWS {
@WebMethod
public String sayGoodbye(@WebParam(name="message") String message) {

   Message esbMessage = SOAPProcessor.getMessage();
   if(esbMessage != null) {
       System.out.println("**** SOAPRequest perhaps mediated by ESB:\n" + esbMessage.getBody().get());
   }
   System.out.println("Web Service Parameter - message=" + message);
   return "... Ah Goodbye then!!!! - " + message;
}
....
}
You can see that we are using the jsr181 annotation to expose it as web service. Noted that we are using the SOAPProcessor class to get the incoming soap message just for demonstration, you don’t have to use it in this class’s implementation.
2.Add web.xml to deploy it in servlet container
In the $webservice_producer/war/resources/WEB-INF/web.xml, it looks like
<servlet>
        <servlet-name>GoodbyeWorldWS</servlet-name>
   <servlet-class>org.jboss.soa.esb.samples.quickstart.webserviceproducer.webservice.GoodbyeWorldWS
</servlet>

<servlet-mapping>
   <servlet-name>GoodbyeWorldWS</servlet-name>
   <url-pattern>/GoodbyeWorldWS</url-pattern>
</servlet-mapping>
Typically, we can build a war file that includes both web.xml and the GoodbyeWorldWS.class, and it should be enough to be published as a web service through JBoss WS. since we are trying to access the web service through our ESB, so we need to define an extra file (jboss-esb.xml) in our case.
3.Add SOAPProcessor in the jboss-esb.xml
In the jboss-esb.xml service section, we need to use the SOAPProcessor as following:
<action name="JBossWSAdapter" class="org.jboss.soa.esb.actions.soap.SOAPProcessor">
<property name="jbossws-endpoint" value="GoodbyeWorldWS"/>
</action>
Here the “jbossws-endpoint” property should be referred to published web service servlet name.
*Tip: There’s one optional property “rewrite-endpoint-url” which is not used in this sample. This property is to support load balance on HTTP endpoints.
4.pack them in esb and war archive
The last step for us it to pack them and then deploy. The war file will include all needed classes and web.xml to publish web service. The esb file will include all needed esb files, like jboss-esb.xml etc. You can bundle the war file into esb archive, which is the way that sample uses.
Until now, we’ve described all of important steps. Next, we will deploy this esb archive into ESB server, you can see the wsdl file at: http://localhost:8080/contract/ (This is offered by ESB), or you can see the one from http://localhost:8080/jbossws/services, that is offered by JBoss WS.
5.Add the client to do the test
So, we’ve completed our server side work. In the example, we defined three gateway for this web service, for the simplicity, we will just look at the one uses JBR gateway to do the test in our client. Here is the client code:
   private void sendMessageToJBRListener(String protocol, int port, String message) throws Throwable {
   String locatorURI = protocol + "://localhost:" + port;
   InvokerLocator locator = new InvokerLocator(locatorURI);
   System.out.println("Calling JBoss Remoting Listener using locator URI: " + locatorURI);

   Client remotingClient = null;
   try {
       remotingClient = new Client(locator);
       remotingClient.connect();

       // Deliver the message to the listener...
       Object response = remotingClient.invoke(message);
       System.out.println("JBR Class: " + response.getClass().getName());
       System.out.println("Response from JBoss Remoting Listener '" + locatorURI + "' was '" + response + "'.");
   } finally {
       if(remotingClient != null) {
           remotingClient.disconnect();
       }
   }
}
We are using the following soap message in our client as input.
<soapenv:Envelope xmlns:soapenv="http://schemas.xmlsoap.org/soap/envelope/" xmlns:good="http://webservice_producer/goodbyeworld">
<soapenv:Header/>
<soapenv:Body>
 <good:sayGoodbye>
    <message>Goodbye!!
 </good:sayGoodbye>
</soapenv:Body>
</soapenv:Envelope>
Run the “ant deploy” to deploy the server into ESB server; Run the ‘ant runtest’, you would get following result:
saygoodbye_over_http:
[echo] Invoking a JBossWS Endpoint over HTTP (via JBoss ESB).
[java] Calling JBoss Remoting Listener using locator URI: http://localhost:8765
[java] JBR Class: java.lang.String
[java] Response from JBoss Remoting Listener 'http://localhost:8765' was '<env:Envelope xmlns:env='http://schemas.xmlsoap.org/soap/envelope/'><env:Header></env:Header><env:Body><ns2:sayGoodbyeResponse xmlns:ns2="http://webservice_producer/goodbyeworld"><return>... Ah Goodbye then!!!! - Goodbye!!</return></ns2:sayGoodbyeResponse></env:Body></env:Envelope>'.
ESB End Point Web Service
Now, we will see the End Point Web Service, the corresponding example is publish_as_webservice in the JBoss ESB distribution. Lets also see it step by step.
1.The Web Service server class
firstly, take a look at the server impl class.
public class ESBWSListenerAction extends AbstractActionLifecycle
{
protected ConfigTree _config;

public ESBWSListenerAction(ConfigTree config)
{
   _config = config;
}

public Message displayMessage(Message message) throws Exception
{
.......
}
Is it just an ordinary ESB action? right, it is. This is totally different from the first one that we saw earlier, we do not have annotation, we used the ESB’s Message Object as input/output parameter.
* Note: In this approach, you can view it as Dispatch/Provider way that we used to have in JAX-WS, it means you deal with the raw soap message directly, the server doesn’t help you do the unmarshall work, this is also a very big difference from the first approach.
2. define request, response, fault xsd
In this example, we just define the in and out xsd. it is as following:
request.xsd
<xs:schema version="1.0" targetNamespace="http://www.jboss.org/sayHi" xmlns:x1="http://www.jboss.org/sayHi"  xmlns:xs="http://www.w3.org/2001/XMLSchema" elementFormDefault="qualified">
<xs:element name="sayHi" type="x1:sayHi"/>
<xs:complexType name="sayHi">
<xs:sequence>
 <xs:element name="arg0" type="xs:string" minOccurs="1"/>
</xs:sequence>
</xs:complexType>
</xs:schema>
Response.xsd
<xs:schema version="1.0" targetNamespace="http://www.jboss.org/sayHi" xmlns:x1="http://www.jboss.org/sayHi"  xmlns:xs="http://www.w3.org/2001/XMLSchema" elementFormDefault="qualified">
<xs:element name="sayHiResponse" type="x1:sayHiResponse"/>
<xs:complexType name="sayHiResponse">
<xs:sequence>
 <xs:element name="arg0" type="xs:string" minOccurs="0"/>
</xs:sequence>
</xs:complexType>
</xs:schema>
We won’t show the fault.xsd for the simplicity.
3. Add xsd file in the jboss-esb.xml
After we’ve defined the xsd file, we will add it in the jboss-esb.xml like following.
       <actions  inXsd="/request.xsd" outXsd="/response.xsd" faultXsd="/fault.xsd">
              <action name="action" class="org.jboss.soa.esb.samples.quickstart.publishAsWebservice.ESBWSListenerAction" process="displayMessage"/>
       </actions>
*Tip: Here it use the ‘service name’ + hard code name, like ‘Binding’ for binding, ‘Op’ for operation name in the generated wsdl. Refer to ESBServiceEndpointInfo class for its detail.
4.build it as an esb artifact and deploy
The last step is to build them as an esb archive and deploy it into the ESB server, as same as the first approach, you can see its wsdl file through either http://localhost:8080/contract or http://localhost:8080/jbossws/services.
The client is as same as the first one(apart from the soap message and url), so I won’t show it again.
Summary
You see two approaches to help you publish web service in JBoss ESB. At first glance, you might think EBWS(second approach here) is simple as you don’t need to build the war file etc. But I would say the first approach is more common in the real use case.
[Acknowledgement]
I’d like to thank my colleague Jim Ma for help me explain these two approaches on publishing web service.
[Reference]
1. JBoss ESB website.
2. JBoss ESB Webservice Producer.
jBPM 4.0 restful service introduction.
We all knew that we’ve had a completely re-write console that is using GWT in jBPM 4.0. But we might not know that we’ve also introduced a set of jbpm restful service. Specifically, it is including following resources: Process Management, Task Management, User Management, Process Engine service etc. These resources are exchanged by using json as data format. The jBPM console (http://localhost:8080/jbpm-console) operates jbpm services through this restful services.
Assume that you’ve installed the jBPM 4.0, started the server, you can see all available services at http://localhost:8080/gwt-console-server/rs/server/resources url. This page basically lists the most important information for the services, like the Method (could be GET, POST etc), the url, consume and produce data format etc.
Now, lets look at how many components are consist of this restful service. In the jBPM server, we can find following three packages.
$JBoss/server/default/lib/gwt-console-rpc.jar
$JBoss/server/default/lib/gwt-console-server-integration.jar
$JBoss/server/default/deploy/jbpm/gwt-console-server.war
These three libraries is the backbone of our restful services.
1. gwt-console-rpc.jar: this jar includes all the domain classes that server used to expose. In other word, this jar define all of data format that we are going to expose to the client.
2. gwt-console-server-integration: This package includes all of abstracted SPIs(Service Provider Interface), like TaskManagement etc. jBPM integration layer uses this to implement these SPIs.
3. gwt-console-server.war: This artifact extends the rpc and server-integration modules(the artifacts in the default/deploy folder will see all libaries in the default/lib folder) , also leverages the RESTEasy lib to expose all of service to be restful. (here we are using the RESTEasy’s jaxb-json provider to expose all the domain model into json data format.)
* Tip: we’ve put all of jBPM related API into the jbpm.jar itself (you can find it under the $JBoss/server/default/lib/jbpm.jar). For the jBPM integration point, we are getting the ProcessEngine API from the JNDI at “java:/ProcessEngine”.
Now you saw these services. Next I will write a simple test to use this service to show you how you can leverage it.
For its simplicity, I won’t do it in the html, that is what jBPM console did, here I will write a test client, and then use the Gson library to convert the json into our domain model(in our gwt-console-rpc).
public class RestfulServiceTest extends TestCase {

  public void testDeploymentRestfulService() throws Exception {
      URL url = new URL("http://localhost:8080/gwt-console-server/rs/engine/deployments");
      HttpURLConnection connection = (HttpURLConnection)url.openConnection();
      connection.setRequestMethod("GET");

      BufferedReader reader = new BufferedReader(new
                InputStreamReader(connection.getInputStream()));

      StringBuffer buffer = new StringBuffer();
      String line = reader.readLine();
      while (line != null)
      {
       buffer.append(line);
       line = reader.readLine();
      }

      System.out.println(buffer.toString());

      Gson gson = new Gson();
      DeploymentRefWrapper result = gson.fromJson(buffer.toString(), DeploymentRefWrapper.class);

      for (DeploymentRef deploymentRef : result.getDeployments()) {
          System.out.println("deployment name is: " + deploymentRef.getName());
      }

      connection.disconnect();
  }

}
Before you run the above code, you need to make sure that you’ve started the jBPM 4.0, and deployed a bar file into the server. Otherwise you would see nothing, as there were no data on the server. (you can refer to my previous blogs if you don’t know how to start and deploy bar artifact into server).
* Note: You need to add the gson lib in your classpath.
Run the test code, you would get following result.
{"deployments":[{"id":"1","suspended":false,"name":"helloworld.bar","timestamp":1249805642238,"definitions":["helloworld-1"],"resourceNames":["review.ftl","META-INF/","META-INF/MANIFEST.MF","helloworld.jpdl.xml","helloworld.png"]}]}

deployment name is: helloworld.bar
First one is the whole data in json format.
[Reference]
1. BPM Console Reference
Build restful service with RESTEasy
Haven’t used JAX-RS to build RESTful service for a while, these days I look at the BPM console project, and one thing is that its service are all rest services. So I tried to build a restful service with RESTEasy library to see how it goes. Hope this blog entry could help people who are also trying to build Restful service with RESTEasy. I am using the RESTEasy 1.1.GA version in our example.
If you are still working on the REST topic, then take a look at this resource, also I strongly recommend that you have a read on 《Restful webservice》if possible. I will build a restful-blog project as our helloworld, and will look into it from three aspects: build, deployment and unit test.
Build the Project
1.create a project and add the resteasy lib
Firstly, lets create the project, I am using the m2eclipse plugin to create a maven blank project. Open up the pom.xml, add the resteay-jaxrs, resteasy-jaxb-provider libs in our pom.xml, in order to download the resteasy-jaxrs, you need to add the jboss maven repo in the repository.
The repository and the dependency would be like:
 <repositories>
  <repository>
   <id>JBossMavenRepo</id>
   <name>JBoss Maven2 repo</name>
   <url>http://repository.jboss.org/maven2</url>
   <releases>
    true</enabled>
   </releases>
   <snapshots>
    false</enabled>
   </snapshots>
  </repository>
 </repositories>

 <dependencies>
  <dependency>
   <groupId>junit</groupId>
   <artifactId>junit</artifactId>
   <version>4.4</version>
   <scope>test</scope>
  </dependency>
  <dependency>
   <groupId>org.jboss.resteasy</groupId>
   <artifactId>resteasy-jaxrs</artifactId>
   <version>1.1.GA</version>
  </dependency>
  <dependency>
   <groupId>org.jboss.resteasy</groupId>
   <artifactId>resteasy-jaxb-provider</artifactId>
   <version>1.1.GA</version>
  </dependency>
Run: mvn eclipse:eclipse, it should generate all the eclipse needed workspace files.
2. Build the Resource service
Here, I created the UserService interface, which takes care of users CRUD operation, and UserServiceImpl to implement UserService. I am a guy that like to keep the API and implementation separated as much as possible. (Because I found people would typically created a resource class directly in building restful service. like they would name it as UserResource class directly, don’t have UserService interface. I still prefer to have interface as the contract.) As the JAX-RS 1.0 spec supports that put the annotation on its interface, so it is ok for us to keep API and impl separated.
Lets look at the UserService firstly.
public interface UserService {

 @GET
 @Path("{id}")
 @Produces({"application/xml"})
 public User getUser(@PathParam("id") long id);

 @POST
 @Consumes("application/xml")
 public Response addUser(User user);

}
JAX-RS spec introduced a set of annotations to help us to expose the java bean as RESTful service.
@Path: This annotation defines which url that we are trying to expose our service to.
@GET: We know that we have five operations in HTTP, they are GET, PUT, POST, DELETE and HEAD. This annotation is mapped to HTTP’s GET, it means you need to use the GET method to access the url to get this resource.
@POST: Mapped to the HTTP’s POST.
@Produces: This annotation defines which media type that this method(every method is a resource here) produced.
@Consumes:This annotation is opposed to the @Produces, this one specifies what kind of media type (format) is expected for this method(resource)
@PathParam: This means we will extract the id value from the url path. Other params are: QueryParam, CookieParam, HeaderParam, FormParam etc.
The ‘Response’ object is a JAX-RS spec defined return type. Client is able to get this object from the HTTP’s Response object.
Now, let’s look at User Object itself,
@XmlRootElement(name="user")
public class User {

 @XmlAttribute
 public long getId() {
  return id;
 }
 @XmlElement
 public String getUsername() {
  return username;
 }
 @XmlElement
 public String getEmail() {
  return email;
 }
.....
}
Here, I omitted the class memeber and its setter methods. You can see that our domain object has the JAXB specific annotation.
Let’s step back and look at what we are trying to do in the UserService, we want client to send a xml file over HTTP to add a User, so we need to have a data binding lib that convert the xml to Java Object, thats the reason that we introduced the JAXB annotation.
Our User Object corresponding xml would be like following:
<user id="1">
 <username>TestUser</username>
 <email>testuser@test.com</email>
</user>
Now, let’s look at the UserServiceImpl class.
@Path("/user")
public class UserServiceImpl implements UserService{

   private Map userDB = new ConcurrentHashMap();
   private AtomicLong idCounter = new AtomicLong();

 public UserServiceImpl() {
  User user = new User();
  user.setId(100);
  user.setUsername("jeff.yuchang");
  user.setEmail("jeff.yuchang@jboss.org");
  userDB.put(Long.valueOf(100), user);
 }

 public Response addUser(User user) {
  user.setId(idCounter.getAndIncrement());
  userDB.put(user.getId(), user);
  System.out.println("User was created, its id " + user.getId());
  return Response.created(URI.create("/user/" + user.getId())).build();
 }

 public User getUser(long id) {
  final User user = userDB.get(Long.valueOf(id));
  if (null == user) {
   throw new WebApplicationException(Response.Status.NOT_FOUND);
  }
  return user;
 }
This is a very simple implementation, you would understand it easily.
Note: Here we got one thing to note is that we’ve used the ‘@Path’ in our impl, we didn’t include this in our UserService interface, the reason that I am doing so is because I didn’t make it work when I deployed it into the Servlet container.
Until now, we’ve built a very simple resource, next is to deploy it under container, and then we can check it through browser or HttpClient code etc.
Deploy it into Servlet Container
In order to deploy our restful resource into Servlet container, we still need to add one class, which needs to extends the ‘Application’ object that defined in the JAX-RS. we can simply view the Application as a registry that allows us to register our resource into system.
public class BlogApplication extends Application {

   private Set<Object> singletons = new HashSet<Object>();
   private Set<Class<?>> empty = new HashSet<Class<?>>();

   public BlogApplication() {
    singletons.add(new UserServiceImpl());
   }

 @Override
 public Set<Class<?>> getClasses() {
  return empty;
 }

    @Override
    public Set<Object> getSingletons() {
       return singletons;
    }

}
Once we’ve finished the Application class, we need to add the web.xml and then use the maven-war plugin file to build a war.
The web.xml is as following:
<web-app>
    <display-name>restful-blog</display-name>

    <context-param>
      <param-name>javax.ws.rs.core.Application</param-name>
      <param-value>org.jboss.resteasy.blog.BlogApplication</param-value>
   </context-param>

    <listener>
        <listener-class>org.jboss.resteasy.plugins.server.servlet.ResteasyBootstrap</listener-class>
    </listener>

    <servlet>
        <servlet-name>Resteasy</servlet-name>
        <servlet-class>org.jboss.resteasy.plugins.server.servlet.HttpServletDispatcher</servlet-class>
    </servlet>

    <servlet-mapping>
        <servlet-name>Resteasy</servlet-name>
        <url-pattern>/*</url-pattern>
    </servlet-mapping>
</web-app>
Also, add the maven-war-plugin into your pom.xml, like
        <plugin>
          <groupId>org.apache.maven.plugins</groupId>
          <artifactId>maven-war-plugin</artifactId>
          <version>2.0</version>
          <configuration>
            <webappDirectory>src/webapp</webappDirectory>
          </configuration>
       </plugin>
Now, run the mvn clean install, you would see the restful-blog-1.0-SNAPSHOT.war in the target folder.
Copy it into the $Tomcat/webapps, start the tomcat, and then access the following url: http://localhost:8080/restful-blog-1.0-SNAPSHOT/user/100, you should see the following xml file.
<user id="100">
<email>jeff.yuchang@jboss.org</email>
<username>jeff.yuchang</username>
</user>
OK, now we’ve successfully built and deployed a restful service. If you are a TDD(Test Driven Development) person like me, I guess you would like to use the embedded servlet container in your unit test.
Unit Test (Embedded servlet container)
RESTEasy has a out-of-box integration with Tiny Java Web Server as the embedded servlet container. We are using the http client as our client in our unit tests.
1.Adding tjws-webserver and servlet 2.5
We need to add the twjs webserver-1.3.3.jar and the servlet-2.5.jar in our pom.xml
  <dependency>
   <groupId>tjws</groupId>
   <artifactId>webserver</artifactId>
   <version>1.3.3</version>
   <scope>test</scope>
  </dependency>
  <dependency>
   <groupId>org.apache.geronimo.specs</groupId>
   <artifactId>geronimo-servlet_2.5_spec</artifactId>
   <version>1.2</version>
   <scope>test</scope>
  </dependency>
2.Write a Base test to start the webserver
I write a following base test, which takes care of starting and stopping servlet server.
public class BaseTest extends Assert{

 protected static TJWSEmbeddedJaxrsServer server;

 protected static ResteasyDeployment deployment;

 protected static int port = 8081;

 @BeforeClass
 public static void initialize() throws Exception{
  server = new TJWSEmbeddedJaxrsServer();
  deployment = new ResteasyDeployment();
  server.setDeployment(deployment);
  server.setPort(port);
  server.start();
 }

 public void addPerRequestResource(Class<?> clazz) {
  deployment.getRegistry().addPerRequestResource(clazz);
 }

 @AfterClass
 public static void destroy() throws Exception{
  if (server != null) {
   server.stop();
  }
 }
3.Write unit test by using http client
And now, comes our unit test class.
public class UserServiceTest extends BaseTest {

 @Before
 public void setUp() throws Exception {
    this.addPerRequestResource(UserServiceImpl.class);
 }

 @Test
 public void testGetUser() throws Exception {
  URL url = new URL("http://localhost:8081/user/100");
  HttpURLConnection connection = (HttpURLConnection)url.openConnection();
  connection.setRequestMethod("GET");

     BufferedReader reader = new BufferedReader(new
               InputStreamReader(connection.getInputStream()));
     String line = reader.readLine();
        while (line != null)
        {
         System.out.println(line);
         line = reader.readLine();
        }

  connection.disconnect();
 }

 @Test
 public void testCreateUser() throws Exception {
  URL url = new URL("http://localhost:8081/user");
  HttpURLConnection connection = (HttpURLConnection)url.openConnection();
  connection.setRequestMethod("POST");
  connection.setRequestProperty("Content-Type", "application/xml");
  connection.setDoOutput(true);
  connection.setInstanceFollowRedirects(false);

  StringBuffer sbuffer = new StringBuffer();
  sbuffer.append("<user id=\"0\">");
  sbuffer.append("   <username>Test User</username>");
  sbuffer.append("   <email>test.user@test.com</email>");
  sbuffer.append("</user>");

  OutputStream os = connection.getOutputStream();
  os.write(sbuffer.toString().getBytes());
  os.flush();

     assertEquals(HttpURLConnection.HTTP_CREATED, connection.getResponseCode());
  connection.disconnect();
 }

}
You should be able to run test cases either in IDE or simply do it by running maven surefire plugin. You could obtain the whole project as a tall bar from here.
[References]
1. RESTEasy user guide.
2. JAX RS 1.0 spec.
code against web service.
Have worked on the web service area since when I joined the IONA in 2007, specifically, from the time that I started working on the Apache CXF project. Although I’ve been working on web service stuff about 3 years, I still thought it is not an easy job to code against web service. these days, some of my friends ask me about the web service, from concepts to its hello-world example. So I think it worths to do a blog entry for people to get started with web service projects.
And then I remembered that Glen has did a ton of great blog entries about web service stack.(CXF, Metro and even Aix2 lately), and all of them are very detail, step-to-step. So here we go, we pick some of Glen’s blog entries to get you started on web service.
It is better that you get some concepts like the WSDL, SOAP, XSD, and read the JAXWS spec if time is allowed, just get a rough idea on it is ok, before we code against web service.
Firstly, let’s see the Creating a WSDL-first web service with Apache CXF or GlassFish Metro entry, it is our ‘hello world’ example.
Want to see the SOAP Message that was transferred on the wire? you have couple options for this. One is to use tools like Apache TCP Monitor or wireshark. Another option is to use the JAXWS handler(similar to interceptor) mechanism, which is a very important feature in the spec. See Glen’s JAX-WS handler blog entry to try it out.
So you saw the soap message on the wire, how can we do with the binary stuff, that is what MTOM is for, you can see “Returning PDFs from Web Services using MTOM and Apache FOP” blog entry for its usage and detail.
If you are a person who like the Test-Driven Development, then don’t miss the ‘creating junit test case for web service‘ blog entry.
Security is a big concern in the enterprise development, so that is what ws-security spec for. firstly, you could read the ‘Using SSL and Basic Authentication with web services (Tomcat or WebLogic)‘ for its basic usage, and then go on reading the username token profile blog entry, Implementing WS-Security with public key certificates for Metro-based web services. Also can read the ‘ Using OpenSAML in JAX-WS Handlers‘ if you are interested in the SAML token profile in ws-security.
I think that should be enough for you to get it started, you can explore more on the Glen’s website, you would find more entries about web service.
Getting Started with jBPM 4.0 (Part IV)
As said in part III, we will revise our example, to create the task form, and then use the jbpm console to take or complete the task.
Firstly, because there was a minor issue related to this feature, which was reported here in the jBPM jira, we will use the ‘form’ attribute in the jpdl file.
1.Add the task form template
Here, we will create a freemarker template file, named review.ftl. the files content is as following:
<html>
<body>
<h2>Please review the request
<form action="${form.action}" method="POST" enctype="multipart/form-data">
<#list outcome.values as transition>
<input type="submit" name="outcome" value="${transition}">
</#list>
</form>
</body>
</html>
2.Add the form attribute in task node
As we said earlier, due to the JBPM-2423 issue in jBPM 4.0 GA, we need to update our jpdl to associate our task form template. the updated section is as following.
<task assignee="alex" g="277,235,92,52" name="review" form="review.ftl">
<transition g="-73,-25" name="approved" to="audit"/>
</task>
3. Update the build.xml, to include the .ftl file in .bar archive
The last step would be to update our build.xml, to include the ftl template file, and also include the png file for the diagram show usage in our jbpm console.
The updated bar package built script is:
<target name="bar" depends="init">
<jar destfile="${basedir}/target/helloworld.bar">
  <fileset dir="${basedir}/src/main/resources">
        <include name="*.jpdl.xml" />
      <include name="*.ftl" />
    <include name="*.png" />
</fileset>
   </jar>
</target>
That is it, now you can re-deploy it into the jBPM server, like we said in the part3.
Task Form in jBPM console
well, after we started the process instance, let’s see the diagram and the task form in its console UI.
On the process instance tab, click the ‘diagram’ button in the instance details page, you would see page as following picture.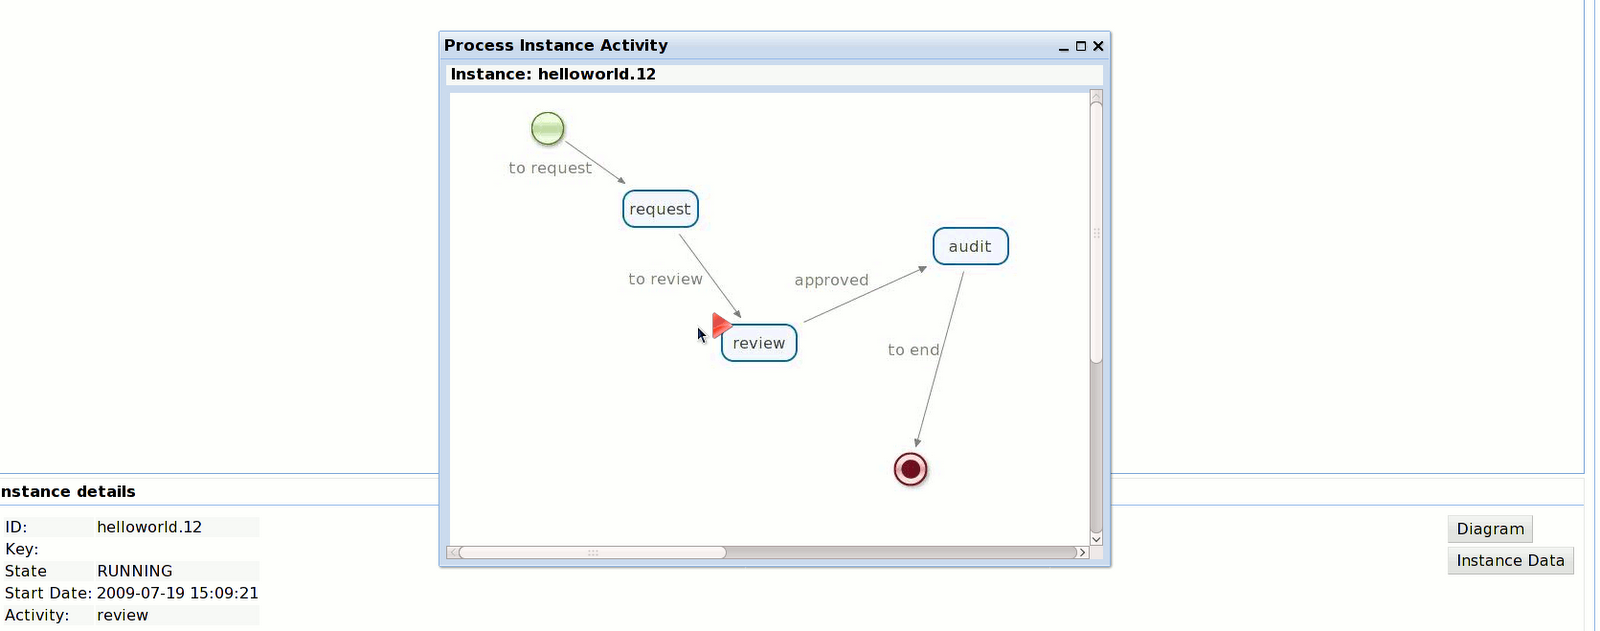
Go to the task list -> Personal tasks, you would see there is a task, the name is called “review”, select the task and click the ‘view’ button, it would pop up the task form interface as following picture.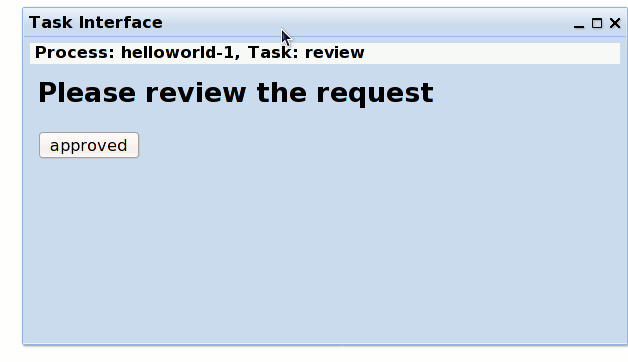
Once you click the ‘approved’ button, the task is completed, and the whole process goes to the ‘audit’ state as we’ve defined in the jpdl file.
So, that is all for the task form example. If you want to know more about the template, like syntax, you can refer to the freemarker webiste.
One thing interesting is that there is a console-server, which is the jbpm console talk to, the console server is responsible for exposing the jBPM service as a RESTful services. You can go to “http://localhost:8080/gwt-console-server/rs/server/resources” to see all available resources. we won’t go detail in this entry, this is an interesting topic that we will cover in the future blog entry.
Summary
Until now, this 《Getting Started with jBPM 4.0》series is finished, you can download the jbpm-helloworld example as a tar ball from here. Its aim is to help you get started, if you want to know more about jBPM 4.0, the userguide and dev guide are very good documents, and you also shouldn’t miss the jbpm user forum.
浅谈ws-security: 加密,签名,证书等
我们这个贴子所谈的,可以说是一个普遍的Security问题,不过因为我在做SOA的东西,所以就想从web service security的角度来探讨一下.必须声明的是,我并不是在解读 ws-security 规范, 从某种意义上来说,是在学习Java Security.
从web service的应用场景来说, 要从endpoint A 发送 SOAP message 到 endpoint B. 一般情况下, 如果我们要保证这个soap message信息的安全,主要会从以下三个方面来考虑,阐述.
- 保密性(Confidentiality)
- 完整性(Integrity)
- 真实性(Authenticity)
我们接下来挨个来看下,是怎么满足这三个需求的,以及在JDK中,分别提供了什么样的API来于之对应.
1. 保密性(Confidentiality)
从大的分类来看,我们有两大种加密技术,分别是对称加密(symmetric encryption)和非对称加密(asymmetric encryption).
1.1 对称加密(symmetric encryption)
对称加密是一个比较早的一种加密方式.比如说Alice要发送一个消息跟Bob,那么他们之前就应该说定了一个secret key,然后Alice把信息用这个secret key进行加密. 当信息到达Bob的时候, Bob再利用这个secret key来把它解密.
这种加密方式,可以是对每个bit进行加密,也可以是对block(chunk of bit, 比如64-bit)进行加密. 如果在是选择block加密的话,就得有一个补足(Padding)的概念,就比如说不够64-bit,你用0或者其他的来补足成一个block.
在Java中, Cipher类是负责加密,解密的.在对称加密中,需要以下三个属性.
1) 加密模式, 比如(ECB -Encryption Code Book, CBC, CFB, OFB, PCBC)
2) 加密算法, 比如(DES- Data Encryption Standard, TripleDES, AES, RC2, RC4, RC5, Blowfish, PBE)
3) 补足方式, 比如(No padding, PKCS5, OAEP, SSL3)
我们下面这个例子就是使用Java的Cipher类来加密.
KeyGenerator keygen = KeyGenerator.getInstance("DES");
keygen.init(56);
SecretKey key = keygen.generateKey();

Cipher cipher = Cipher.getInstance("DES/ECB/PKCS5Padding");
cipher.init(Cipher.ENCRYPT_MODE, key);

byte[] cipherText = cipher.doFinal("This is clear text".getBytes("UTF-8"));

cipher.init(Cipher.DECRYPT_MODE, key);
byte[] clearText = cipher.doFinal(cipherText);
先是生成一个56的DES的加密钥匙, 然后采用DES算法, ECB加密模式, PKCS5Padding补足方式来加密.
1.2 非对称加密(Asymmetric Encryption)
对称加密存在的一个主要问题在于怎么安全的配发这个密钥给Alice和Bob呢?所以,我们后来引入了这个非对称加密,可以说现在这个是一个很普遍的加密方法.
非对称加密主要是他有两把钥匙, 公钥(Public Key)和私钥(Private Key),这两把钥匙是配对的. 一样的情况, Alice想发送信息给Bob, 那么流程就如下:
Alice使用Bob的公钥加密信息 -> 加密过的信息 ->Bob用他自己的私钥解密.
这种情况下,大家只需要把公钥放在一个信任的机构(CA,例如Verisign),把私钥保留在自己手上,那么就解决了对称加密中密钥的配发问题.当然了,这个非对称加密的伟大之处还在于如果你没有私钥,至少在你的有生之年是无法破解的.
非对称加密的算法主要有两种: RSA 和 Diffie-Hellman. RSA是最为广泛使用的一种加密算法.
相对应的,我们就得使用keypair来加密解密,代码如下:
KeyPairGenerator keyGen = KeyPairGenerator.getInstance("RSA");
keyGen.initialize(1024);
KeyPair keypair = keyGen.generateKeyPair();

Cipher cipher = Cipher.getInstance("RSA/ECB/PKCS1Padding");
cipher.init(Cipher.ENCRYPT_MODE, keypair.getPublic());

byte[] cipherText = cipher.doFinal("This is clear text".getBytes("UTF-8"));

cipher.init(Cipher.DECRYPT_MODE, keypair.getPrivate());
byte[] clearText = cipher.doFinal(cipherText);
不同的是,我们用公钥加密,然后用私钥来解密. 当然了,我们也可以用私钥加密,然后公钥来解密,这在我们后面的数字签名中会用到.
2. 完整性(Integrity)
我们可以用加密的手段对信息进行了加密,那么保证这个信息的明文不会被其他人看到,但是我们怎么来保证说这个发过来的信息就是完整的呢?
那么我们这里就因为一个叫信息摘要(Message Digest)的概念,所谓的信息摘要就是说用一个摘要算法,把信息生成一串字符,可以算是信息的足迹(fingerprint of the message). 这种算法是一个单方向的,也就是说,从生成的字符想倒推到原来的这个信息,那几乎是不可能的.这个算法的另外一个特点是,只要你对信息做一个小小的改动,那么生成的字符串差别就很明显.
常见的消息摘要(Message-digest)算法有: MD2, MD5 (128位的算法), SHA-1 (160位的算法)
在Java中,MessageDigest类来负责信息摘要,使用大致如下:
MessageDigest messageDigest = MessageDigest.getInstance("MD5");
messageDigest.update("TestMessage".getBytes("UTF-8"));
System.out.println(new String(messageDigest.digest(), "UTF-8"));
3. 真实性(Authenticity)
上面我们解决了保密性和完整性,那我们怎么来保证Bob收到的这个信息就是Alice发的吗?有可能是Eva借用Alice的名字,拿到Bob的公钥发的.
基于这个考虑,我们就引入了一个数字签名(Digital Signature)的概念.数字签名就是在你发送信息的时候,用你的私钥进行加密,实际应用中,会对信息摘要进行数字签名,那么当Bob收到这个被数字签名过的信息摘要时,用Alice的公钥去解密,就可以确定这个消息是来自于Alice.
数字签名的算法有两种: RSA, DSA(Digital Signature Algorithm). 注意, RSA算法,既可用于加密,也可以用于数字签名. 但是DSA只可用于数字签名.
JDK支持以下的组合, MD2/RSA, MD5/RSA, SHA1/DSA, SHA1/RSA.
下面我们直接看JDK中Siganiture类来签名的使用.
KeyPairGenerator keyGen = KeyPairGenerator.getInstance("RSA");
keyGen.initialize(1024);
KeyPair keypair = keyGen.generateKeyPair();

Signature sig = Signature.getInstance("MD5WithRSA");
sig.initSign(keypair.getPrivate());
sig.update("This is message".getBytes("UTF-8"));

byte[] signature = sig.sign();

//Verify the signature
sig.initVerify(keypair.getPublic());
sig.update("This is message".getBytes("UTF-8"));
if (sig.verify(signature)) {
  System.out.println("Signature verified.");
}
到目前为止,我们介绍了加密,信息完整,数字签名这三个概念,应该说可以是完成了,你都懂了.
但是,等等,你是不是在经常听到说证书,X.509, keytool, keystore等等的概念呢?
下面,我们再来依次看看这几个概念.
4. 证书(certificates) & X.509
之前我们说,在这种非对称加密算法中,我们一般会把公钥放在一个另外一个机构,这个机构专门负责来保管你的公钥,而且这个机构还负责核实你的真实性. 那么他一旦核实你后,就会创建一个东西,这个东西包含了你的公钥,你的个人信息(Identity),然后再用这个机构的私钥进行数字签名. 我们管这个东西就叫数字证书. 我们管这样的机构叫做CA( Certificate Authority)
X.509是一种存储证书的标准,我们通常直接叫X.509证书.
5. keytool, keystore
keystore是用来存放钥匙(包括公钥,私钥),证书的容器. keystore是一个以.keystore为后缀名的文件.在keystore里面的钥匙和证书可以有名字,叫做alias. 而且他们各自可以有密码保护.
JDK自带的keytool是用来创建keystore以及key的工具,下面我们来看几个常用的命令.
1) 创建keys (注意不能换行).
keytool -genkey -alias serverkey -keypass serverpass -keyalg RSA -sigalg SHA1withRSA -keystore server.keystore -storepass nosecret
keytool -genkey -alias clientkey -keypass clientpass -keyalg RSA -sigalg SHA1withRSA -keystore client.keystore -storepass nosecret
2)导出证书
keytool -export -alias serverkey -keystore server.keystore -storepass nosecret -file servercert.cer
3)导入证书
keytool -import -alias serverkey -keystore client.keystore -storepass nosecret -file servercert.cer
6. keystore, truststore的区别
在跟web service 打交道,或者做测试的时候,你会经常听到trust store这个词,他其实就是一个CA,他是专门存放public key的; keystore是既存放public key,也存放private key的.
这个贴子上, Jason详细的解释了在ws security中,keystore和truststore的配置问题.
[References]
Java security Part 1, Crypto basics
Understanding WS-Security
WS-Security signing and encryption
Keytool documentation
